I must admit that I have been putting off making one of these Book Box Cards because of how complicated they look. Although they probably aren't for the beginning card maker, they really aren't as tricky as they seem at first glance and the effects you can achieve are well worth the effort.
Requirements:
8" x 101/2" piece of cardstock for the card blank
Two 71/2" x 71/2" pieces of cardstock
Two 71/2" x 43/4" pieces of cardstock
Two 10" x 2" pieces of cardstock
Two 7" x 2" pieces of cardstock
One 111/2" x 3" piece of cardstock
Two 73/4" x 1/2" strips of patterned paper
Two 43/4" x 1/2" strips of patterned paper
One 7" x 4" piece of patterned paper
One 7" x 4" piece of acetate - dry embossed
Co-ordinating ribbon at least 1/2" wide
Double sided tape
Foam Tape
Quick drying glue
Chalk ink for inking the edges of the cardstock
Scoreboard and stylus
Border punch of choice
Tweezers
Small sharp scissors
Craft knife and cutting mat
Ruler, pencil, eraser
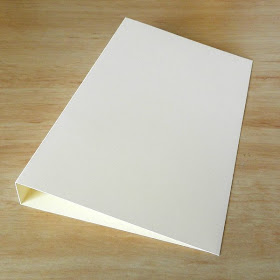
1. Place the 8" x 101/2" piece of cardstock horizontally (landscape orientation) on the scoreboard. Score at 5" and again at 51/2".
2. Fold along the score lines to form an 8" x 5" card with a 1/2" spine.
3. Cut a window out of the front of the card leaving a 3/4" frame. Ink all the edges.
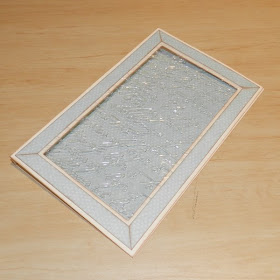
4. Mitre the corners of the 73/4" and the 43/4" strips of patterned paper (cut the ends on a 45 degree angle). If you look closely at the picture below you will notice that the angle of the mitre is different on each end of the paper strips. Ink the edges of the patterned paper. Place a thin strip of double sided tape around the four edges of the acetate.
5. Adhere the embossed acetate over the window you cut earlier. Use double sided tape to secure the paper strips over the edges of the acetate, ensuring the mitred edges are all lined up neatly.
6. Centre and adhere the 7" x 4" piece of patterned paper on the inside of the card.
7. Concertina fold (mountain, valley, mountain, valley, etc.) the two 71/2" x 71/2" pieces of cardstock and the two 71/2" x 43/4" pieces of cardstock at 3/4" intervals. (Note that the 71/2" x 43/4" pieces are scored and folded across the short length). Ink the edges.
8. To form the sides of the card, take one of the long concertina pieces in one hand, and one of the short pieces in the other and fit them together as shown in the pictures below. You will get a much better fit if your folds are precise and even.
9. Use some double sided tape to secure the top and bottom of each corner only. Do not add adhesive between the concertina folds.
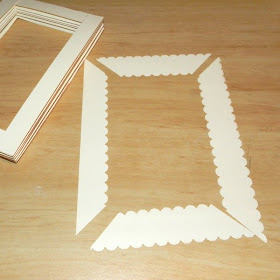
10. Use the two 10" x 2" pieces of cardstock and the two 7" x 2" pieces of cardstock and your border punch to make a cover for the concertina frame you just created. You want each piece of the frame to be about 1" wide and when assembled the entire piece should be no more than 8" long and 5" wide. As you can see in the picture below, I kept the far left hand edge of the frame smooth so it can butt up against the spine of the card.
I apologise for not being more specific with the measurements in this step. The difficulty comes with the differences between border punches. Some bite much deeper than others and so it is hard to know how much cardstock is going to be cut away. You might want to experiment with newspaper or printer paper before cutting into your cardstock.
11. Begin layering your images into the concertina frame with glue or double sided tape. Secure parts of the image on the folds of the frame to add layers and create dimension.
12. Add some double sided tape to the back of the frame, and add some foam tape to the back of the image for added support.
13. Secure the frame to the inside of the card, keeping the left side of the frame flush against the second fold of the card.
14. Continue building up your image using the folds of the frame to hold each of the different layers.
15. Add the strips of cardstock to the frame and secure with double sided tape. As you can see from the photo below, I mitred the corners to give a nice neat finish. Alternatively, you could cut a single frame from a sheet of cardstock.
16. A few more blossoms complete the look.
17. Use the 111/2" x 3" piece of cardstock to make a band to hold the card securely closed. Punch along both long edges with the same border punch you used inside the card, fold the strip around your card being careful not too pull it too tight nor leave it too loose. Secure the end with double sided tape.
18. Use double sided tape to secure the ribbon around the band, then finish with a bow.


That is AWESOME!! Thanks for the tutorial!
ReplyDeleteWow Beccy what a crad and what fabulous demo's you are a star this is gorgeous I love it . Well done Hugs Elaine
ReplyDeleteStill complicated, but WOW, it's nice! At least yours is very nice!
ReplyDeletewow I love it. Wonderful card :)
ReplyDeleteSo pretty!!!!
ReplyDeleteThanks! You made something that I thought would be too complicated seem do-able.
ReplyDeleteWow, so beautiful!
ReplyDeleteWow, so beautiful!
ReplyDeleteThis is really lovely Beccy. Thanks for all the details and the good photos. I have also eyed this card for a while, so now am really inspired to try it.
ReplyDeleteYour card is very beautiful, gorgeous in fact. Thanks for the tutorial!
ReplyDeleteHi Beccy,
ReplyDeletethank you for the tutorial ... al wonderful card you made!
xxx
Anja
xxx
wow this is gorgeous beccy.
ReplyDeletegreetings karin
Splendide. J'adoooore . Merci pour le tuto.
ReplyDeleteLilianne
What a beautiful card and fabulous gift in itself for someone. Thanks for the well explained tutorial. Just wondering what the measurement is between the mountain and valley folds for the sides? Many thanks!
ReplyDeleteMy apologies for leaving out that measurement Karen, thanks for letting me know. It's actually 3/4" between each fold. I've now updated the tutorial to include it.
DeleteCheers,
Beccy
This is great Beccy, I have been looking at these box cards too, may be inspired to make one now soon. Great tutorial also, thanks again :) Viv xx
ReplyDeleteoh my goodness. A very complicated card!! Maybe iI will give 1 a go for mothers day. THanks for the tut
ReplyDeletewhat a beautiful creation quilling I love your work!
ReplyDeletenice weekend
Greetings Baukje
Beccy this is gorgeous! I really must give it a try--been so crazy busy this last bit tho :)
ReplyDeleteThanks for the awesome tutorial :)
Gorgeous, gorgeous, gorgeous!!! I've never seen this technique before. it's fabulous.
DeleteThanks for the tutorial Beccy! Have seen this in a book but not as a card before, almost the same technique. I have one on my blog: http://www.yogibear1301.blogspot.com/2011/11/congratulations-in-book.html
ReplyDeleteI am def going to try your tut, not today but some day!
Have a great weekend,
Hugs Yolanda
Thanks for sharing
ReplyDeleteFabulous Creation!, thanks for the tutorial. GREAT Job!
ReplyDelete-Sony
Your tutorials are so easy to follow.
ReplyDeleteBeccy, I fell in love with this one too. I finally had the time to make one and I made a Silhouette Studio cutting file for it too. Your tutorials are the best! My book card is posted on my blog now. Thank you, thank you for all you share. XXX - Debbie
ReplyDeleteOMG I LOVE YOUR BLOG :3 (I HAVE HEART EYES right now) lol
ReplyDeletePretty as a picture! Hugs, Lesley
ReplyDeletewow, ich bin begeistert und kann von ihren wundervollen Karten überhaupt nicht genug bekommen....vielen Dank auch für die Freebies und die Tutorials
ReplyDeleteIch wünsche ihnen ein wunderschönes und kreatives neues Jahr
Amazing! This is simply stunning an gorgeous. Thanks so much for sharing with us! :)
ReplyDeleteI just love it I will try it and hope it looks as nice as yours, quite a challenge! Thanks for sharing and I know you must have spent a lot of time on this tutorial. Amazingly good job.
ReplyDeleteJoanne
I'm impressed, this is beautiful and already framed. :)
ReplyDeleteThis card looks too complicated. It is amazingly beautiful though!
ReplyDeletethanks for sharing and making it look so easy,
ReplyDeleteWow, such an amazing card!! Love the tutorial! :)
ReplyDeletebeautiful card, thanks for showing us how.
ReplyDeleteBeautiful,thank you so much for sharing,really great inspiration!
ReplyDeleteWow, such an awesome card!! Love the tutorial! :) Beautiful
ReplyDeletethank you soooooo much for the tutorial!
ReplyDeleteGreat work, useful tutorial, thank you!
ReplyDeleteGood one..., Thanks for the awesome tutorial :)
ReplyDeleteWhat a fantastic card and a clear and precise tutorial. thank you so very much
ReplyDeleteYou have wonderful tutorials!
ReplyDeleteWow!! Your creation is just awesome!! Thanks for sharing it. Shall look for more in future.
ReplyDeleteAwesome instructions. Can't wait to try making this!
ReplyDeleteThank you so much for taking the time to explain how to make it.